Celebrities suffer from the same skin conditions as everyone else, yet their skin almost always seems to be smooth, glowing and free of imperfections. We've listed the celebrities with the top ten best complexions and revealed a bit of their personal beauty regimens to help get you one step closer to having a red carpet worthy complexion.
1. Liv Tyler
Liv Tyler has clear, porcelain-like skin which has been a calling card of hers since the beginning of her career. Unlike her rockstar father, Liv has likely strayed from the heavy smoking that can advance the aging of skin. She has also avoided too much direct sunlight, which can be especially harmful on fairer skin. Some rumors in recent years have suggested that Tyler might also have undergone some Botox treatments to keep her visage looking as smooth and clear as a Elven princess.
2. Ashton Kutcher
Ashton Kutcher may be over thirty but his lack of fine lines, enlarged pores or wrinkles certainly make his age hard to discern. While it's likely that Kutcher has had some Botox injections, his smooth facial texture might just be courtesy of a good cleansing and moisturizing regimen paired with regular microdermabrasion and glycolic treatments.
3. Cate Blanchett
Cate Blanchett has radiant, glowing skin. Her fair skin, naturally more prone to sun damage, has clearly been taken good care of. Religious usage of sunscreen and hats or umbrellas likely play a big role in the health of Blanchett's glowing skin.
4. Halle Berry
Halle Berry has beautiful skin for a woman of any age. A combination of careful living, protecting the skin from sun damage and smoking, as well as Botox and Thermage treatments to firm and tone the skin are all attributed to Berry's gorgeous complexion. Berry's skin care regimen has helped her maintain "hottest celeb" status for many years.
5. Anna Kournikova
Anna Kournikova has smooth, beautiful and noticeably hairless skin that continues to earn her admirers even in her post-tennis years. It's likely that Kournikova has had some Laser Hair Removal or a Microdermabrasion treatment here and there, providing her skin with a glistening, flawless appearance.
6. Vanessa Hudgens
Vanessa Hudgens is a teen star and also the new Neutrogena spokesmodel. Smooth, clear and acne free, it appears that Hudgens has begun taking excellent care of her skin at a young age. While likely too young to be getting Botox or other clinical treatments, she has complexion that most actresses would need a microdermabrasion or photofacial to even approach.
7. Vanessa Williams
Vanessa Williams is well known for being beautiful and vivacious. As a star on the hit show Ugly Betty, her skin is looking just as beautiful today as when she was crowned Miss America in 1984 . Williams attributes her smooth, wrinkle-free skin to Botox, saying that it was quick, natural looking and long lasting.
8. Nicole Kidman
Nicole Kidman has fair and beautiful skin. It is obvious that her skin has been protected through reducing sun exposure. Her lack of fine lines, wrinkles or redness are all signs of well protected skin, an achievement all the more impressive for a fair-skinned woman.
9. Penelope Cruz
Penelope Cruz has exquisite skin and exotic looks. Her gorgeous skin is a combination of a good skin care regimen, a healthy diet, and probably a little bit of great genetics. There has also been speculation that Cruz has has Botox injections in her forehead to keep it smooth, as well as Restylane fillers in her lips.
10. Lucy Liu
Lucy Liu is known for a smooth, young looking skin. Liu has shared her secrets saying she never drinks coffee, avoids caffeine altogether, and drinks a lot of water throughout the day.
Want a leg up in getting your own celebrity caliber skin? Contact us today to schedule a free consultation with a skin care specialist near you!
Our spies at Neiman Marcus in Beverly Hills spotted Penelope Cruz purchasing the Face Lifting Formula from the new Beauty by Clinica Ivo Pitanguy skin care line. This luxurious cream features peptides, vitamin E, avocado oil and extracts of coffee, algae and clary sage to refine, retexturize and firm the skin.
Celebrity Skin Secret: Heather Locklear and Madonna
Banish fine lines with a product called Micro Pearl Abrasion (visit MicroPearlAbrasion.com). This celebrity secret product was created for the women of Baywatch, to keep their skin looking youthful. It is a scrub that you use each day for 5 days. In a clinical 28 day trial, women saw on average a 31% reduction in their fine lines!
Celebrity Skin Secret: Gwyneth Paltrow and Brittany Murphy’s
Skin guru Sonya Dakur recommends getting more zinc (found in meats, beans, and milk), Vitamin C (found in citrus fruit) and flaxseed oil (found in health food stores, and can be drizzled over your salad). Zinc and vitamin C are protective and strengthen the skin. The flaxseed oil will thin the blood in your skin a bit so your pores are less likely to clog. The three work together to help your skin heal more quickly, so that when you get acne it won’t take as long for the red spots to fade away. She also recommends getting these in the food form over the pill form and her best celebrity skin secret is drink plenty of water to keep skin from looking dry and tired.
Celebrity Skin Secret: Lisa Rinna
The hostess of Soap Talk, and a Dancing with the Stars contestant counts Glyquin XM Skin bleaching cream among her favorite skin products. It fades hyperpigmentation (areas of the face that are a darker color than the rest of your skin). It hydrates skin, contains an SPF, and also includes vitamin C, E, and glycolic acid.
Celebrity Skin Secret:
Celebrity dermatologist Kathy Fields, M.D. recommends exfoliating the skin to keep pores unclogged and acne from forming. Make sure the beads in the exfoliation product are spherical and not jagged and rough (steer clear of apricot scrubs which contain beads that are too irritating to the skin, they actually result in microscopic tears in the skin). A good exfoliating product to try is Proactiv Solution Renewing Cleanser.
Get Great Skin from the Inside
Learn the secrets to mastering the necessary lifestyle changes for achieving beautiful skin. Includes great tips for relieving stress with such interesting techniques as “high tech meditation”, getting tons of water (even if you hate the taste), getting a great night’s sleep without medication, quitting smoking, avoiding drinking and drugs, eating for beautiful skin, and making exercise fun!
Get Great Skin from the Outside
In this article you will learn how to make your skin even more beautiful, and how to keep it that way for as long as possible, by designing your perfect, personalized skin care routine. Here you will learn the secrets to picking out your perfect cleanser, sunscreen, moisturizer, exfoliation product, eye makeup remover, mask and toner. You will also learn how to be a smart consumer and a savvy shopper by discovering which ingredients you should look for and which you should avoid.
A breast implant is a prosthesis used to alter the size and shape of a woman's breasts (known as breast augmentation, breast enlargement, mammoplasty enlargement, augmentation mammoplasty or the common slang term boob job) for cosmetic reasons, to reconstruct the breast (e.g. after a mastectomy or to correct congenital chest wall deformities), or as an aspect of male-to-female sex reassignment surgery. Pectoral implants are a related device used in cosmetic and reconstructive procedures of the male chest wall. A breast tissue expander is a temporary breast implant used during staged breast reconstruction procedures.
There are two primary types of breast implants: saline-filled and silicone-gel-filled implants. Saline implants have a silicone elastomer shell filled with sterile saline liquid. Silicone gel implants have a silicone shell filled with a viscous silicone gel. Several alternative types of breast implants had been developed, such as polypropylene string or soy oil, but these are no longer manufactured.
Procedure
The surgical procedure for breast augmentation takes approximately one to two hours. Variations in the procedure include the incision type, implant material, and implant pocket placement.
Incision types
Breast implants for augmentation may be placed via various types of incisions:
* Inframammary - an incision is placed below the breast in the infra-mammary fold (IMF). This incision is the most common approach and affords maximum access for precise dissection and placement of an implant. It is often the preferred technique for silicone gel implants due to the longer incisions required. This method can leave slightly more visible scars in smaller breasts which don't drape over the IMF. In addition, the scar may heal thicker.
* Periareolar - an incision is placed along the areolar border. This incision provides an optimal approach when adjustments to the IMF position or mastopexy (breast lift) procedures are planned. The incision is generally placed around the inferior half, or the medial half of the areola's circumference. Silicone gel implants can be difficult to place via this incision due to the length of incision required (~ 5 cm) for access. As the scars from this method occur on the edge of the areola, they are often less visible than scars from inframammary incisions in women with lighter areolar pigment. There is a higher incidence of capsular contracture with this technique.
* Transaxillary - an incision is placed in the armpit and the dissection tunnels medially. This approach allows implants to be placed with no visible scars on the breast and is more likely to consistently achieve symmetry of the inferior implant position. Revisions of transaxillary-placed implants may require inframammary or periareolar incisions (but not always). Transaxillary procedures can be performed with or without an endoscope.
* Transumbilical(TUBA) - a less common technique where an incision is placed in the navel and dissection tunnels superiorly. This approach enables implants to be placed with no visible scars on the breast, but makes appropriate dissection and implant placement more difficult. In that regard, it is pertinent that a published medical journal report analyzed a consecutive series of more than 1300 TUBA cases done by a single surgeon over a 15 year span, with no instance of incorrect implant placement. Transumbilical procedures are performed bluntly, with or without an endoscope (tiny lighted video camera) to assist dissection. This technique is not appropriate for placing silicone gel implants due to potential damage of the implant shell if attempting insertion through the small 2 cm incision in the navel, and as those implants are pre-filled they cannot be passed through that incision.
* Transabdominoplasty (TABA) - procedure similar to TUBA, where the implants are tunneled up from the abdomen into bluntly dissected pockets while a patient is simultaneously undergoing an abdominoplasty procedure.
* Areolar Vertical Approach (AVA) - the technique created by Dr. Lejour and developed by Dr. Van Thienen, is a very similar approach to the periareolar as the insicion is the same, but leaves a more extended submuscular pocket for the Silicon Gel Implants, through the transglandular sectione to the top pectoral fascia. The cavity is drained after being washed with Saline solution before the implants are placed. This technique developed in Argentina was proved to have excelent results even after numerous long term surgeries.
Types of implants
Saline implants
Saline-filled breast implants were first manufactured in France in 1964, introduced by Arion with the goal of being surgically placed via smaller incisions. Current saline devices are manufactured with thicker, room temperature vulcanized (RTV) shells than earlier generations of devices. These shells are made of a silicone elastomer and the implants are filled with salt water (saline) after the implant is placed in the body. Since the implants are empty when they are surgically inserted, the scar is smaller than is necessary for silicone gel breast implants (which are filled with silicone before the surgery is performed). A single manufacturer (Poly Implant Prosthesis, France) produced a model of pre-filled saline implants which has been reported to have higher failure rates in vivo.
Saline-filled implants were most common implant used in the United States during the 1990s due to restrictions that existed on silicone implants, but were rarely used in other countries. Good to excellent results may be obtained, but as compared to silicone gel implants, saline implants are more likely to cause cosmetic problems such as rippling, wrinkling, and to be noticeable to the eye or the touch. Particularly for women with very little breast tissue, or for post-mastectomy breast reconstruction, silicone gel implants are considered as superior. In patients with more breast tissue in whom submuscular implant placement is used, saline implants can look very similar to silicone gel.
Silicone gel implants
Thomas Cronin and Frank Gerow, two Houston, Texas, plastic surgeons, developed the first silicone breast prosthesis with the Dow Corning Corporation in 1961. The first woman was implanted in 1962. Silicone implants are generally described in terms of five generations which segregate common characteristics of manufacturing techniques.
Implant pocket placement
The placement of implants is described in relation to the pectoralis major muscle.
* Subglandular- implant between the breast tissue and the pectoralis muscle. This position closely resembles the plane of normal breast tissue and is felt by many to achieve the most aesthetic results. The subglandular position in patients with thin soft-tissue coverage is more likely to show ripples or wrinkles of the underlying implant. Capsular contracture rates may also be slightly higher with this approach.
* Subfascial - the implant is placed in the subglandular position, but underneath the fascia of the pectoralis muscle. The benefits of this technique are debated, but proponents believe the fascial layer of tissue may help with coverage and sustaining positioning of the implant.
* Subpectoral ("dual plane") - the implant is placed underneath the pectoralis major muscle after releasing the inferior muscular attachments. As a result, the implant is partially beneath the pectoralis in the upper pole, while the lower half of the implant is in the subglandular plane. This is the most common technique in North America and achieves maximal upper implant coverage while allowing expansion of the lower pole. Animation or movement of the implants in the sub pectoral plane can be excessive to some patients.
* Submuscular - the implant is placed below the pectoralis without release of the inferior origin of the muscle. Total muscular coverage may be achieved by releasing the lateral chest wall muscles (serratus and/or pectoralis minor) and sewn to the pectoralis major. This technique is most commonly used for maximal coverage of implants used in breast reconstruction.
Foundation is an important facet of makeup - the blank canvas on which the rest of your makeup is applied. It is the base for any makeup application - to hide facial imperfections such as scars, depressions and pigmented areas of skin.
Foundation is one such element that is used keeping in mind the skin tone of the user. In order to get finesse, the foundation should blend properly. Select the foundation that is close and of same color as your skin tone. Bronzer can always be used in case you need to add more color at the end. Foundation comes in two to three forms like stick, liquid and powder but the main point to keep in mind is that it should match your skin tone. Using a foundation is like painting a picture and your face acts as a canvas for the picture. To evenly apply the foundation all over the face you can always use a foundation brush. The foundation applied with the help of brush will last longer than if you apply it with your finger tips, as with finger tips you can add bacteria and oil on your face.
Your method of makeup application and your applying techniques will determine the quality of the end product. Apply your foundation with a cosmetic sponge for more control and a smoother application.
Learn how to use foundation, powder, blush and bronzer for a smooth makeup look. So, next time that you think of trying a new look, you will have the knowledge and confidence to apply a beautiful makeup application!
Wherever possible, and for best results, apply foundation with a top quality, natural bristle, foundation brush. They have a remarkable impact on the finish of your base as they allow for far greater control over the placement, texture and finish of your foundation than any other application technique.
Some foundation formulations preclude the use of a brush, or perhaps the portability of a sponge is simply preferred, so ensure that you use a good quality, compacted sponge. It is often necessary to replace the sponge that comes with a new compact foundation as cosmetic companies, even high end brands, tend to cut corners where this vital piece of kit is concerned. A new, compacted sponge can make all the difference to a product you previously dismissed.
The Type of Foundation
1. Liquid foundation
Liquid foundations are probably the most versatile and suit most skin types. Liquid foundations are easy to use and they come as thick liquid in a bottle. These foundations are available in oil-based and water-based formulas. Water based foundations blend effortlessly and evenly over the face. They contain oil or emollient that cover the skin smoothly with a hint of sheen. Water based foundations are best suited for women of color as they leave a small amount of shine behind on the skin.
Water based foundations usually contain some silicon oil and offer very light coverage as compared to oil based liquid foundation. Similarly oil based foundations work well for women with extremely dry or wrinkled skin. Though they are greasy and thick, they blend quite well with such skin making it look dewy and moist. Liquid makeup foundation captures moisture within the skin. It also lends a luminous finish.
2. Cream Foundation
Cream foundations are ideal for dry skin. These are usually creamy and offer excellent coverage to the skin. Generally, cream foundations are known for their heavier coverage and more intense moisturizing properties. Women with normal, dry and especially extra-dry skin can buy cream makeup foundation. Compact foundation - This creamy yet powdery foundation type works well with most skin tones and glides easily with a sponge. It is easily portable.
3. Cake or Stick foundation
These foundations are solid in form and they have a greater drying effect. The cake or stick foundations are best suited for an oily skin. These foundations give a dense matte cover and are good for covering blemishes and scars. Due to their texture, they can also double as concealers Solid foundations like cake and stick are good for occasional use, especially photography sessions. Applying stick foundation may need some getting used to.
4. Waterproof foundation
Sometimes the extra coverage of a foundation may not really last for a long time. This is especially possible in summer due to the humidity and high temperatures that may prevail throughout the day. During these days waterproof foundation is of great help to your skin. Waterproof foundation comes in different shades to suit a variety of skin types. These foundations are water-resistant and make your skin look glamorous in spite of the sweltering conditions.
5. Mineral Foundation
Mineral foundations contain minerals that have been used for cosmetic purposes for thousands of years. Most of these minerals are used to prepare foundations to suit all skin types. These foundations are medicated and they can also be used to cover acne and pimples. Loose mineral foundation can be applied dry or wet and usually provides full spectrum sunscreen. Containing mica, titanium dioxide, iron oxides and zinc oxide, mineral foundation provides a dewy fresh look.
Mineral Foundations are becoming increasingly popular, and for good reason. They rarely contain the skin damaging ingredients so often found in regular foundation formulations, and are incredibly versatile in coverage control. When correctly applied, mineral foundation provides a flawless finish comparable to any foundation on the market. The secret to precision application? Moisture.
6. Spray Foundation
Spray foundationsare yet another medicated foundation that are preferred for acne scarring and post surgical skin. Spray foundations are used to retain the makeup for long hours. You can just spray them over your makeup to refresh it at anytime. Spray foundations come in different shades for different skin tones.
HOW DO I USE MY FOUNDATION?
The very first step in selecting your perfect foundation makeup is assessing your skin type, to determine the type of foundation that would work best for you.
Selecting the right shade of foundation for your skin tone is critical. Most women have yellow-based skin. To get a perfect match and to create the look of having naturally flawless skin, you need to wear a foundation with a yellow base.
Apply your foundation with a cosmetic sponge for more control and a smoother application.
Liquid foundation should be blended in a little at a time until the entire face is completed. Matte liquid foundations generally dry faster, so you may need to apply to one section of your face and blend, before moving on to another section. If you have naturally clear skin, liquid foundations may be your best option. Cream foundation should be applied in long sweeping motions using your cosmetic sponge. Blend evenly until you create a smooth flawless finish. This type of foundation is best for drier skin types and for more mature skin. Ideal for women requiring heavier coverage.
Powder foundation should be applied as you would your normal compact powder. These foundations usually have very good coverage, but work best on lighter skin colors.
Camouflage foundations have been developed for women who need to conceal marks, acne, vitiligo, rosacea, etc. They provide maximum coverage and generally have excellent staying power. The one problem with such heavy coverage foundations is that they often do not blend well with most skin colors, resulting in an artificial, two-toned look.
Remember, proper blending is the key. Blend your foundation under the jawline, into the hairline, on the ear lobes. Pay special attention to the corners of the nose, corners of the mouth, over and under the eyes. If you need to retouch a particular spot, re-apply lightly and blend. Lightly powder with a yellow based translucent face powder to set your foundation.
Skin Type and Foundation
* If you have an oily skin go in for oil-free or oil-control foundation. On the other hand if you have dry skin shop for moisturizing foundations. If you have combination of oily and dry skin, determine the most type prevalent in your skin and purchase a foundation accordingly. Cream-to-powder based foundation work best for combination skin.Once and for all its over. Ok?
* Select a foundation that seems close to your natural skin tone. Yellow based foundations look most natural on all skin types. However if you are very fair, try pink or a cooler shade. Women make a primary mistake of choosing a foundation that is too light for their skin in the hope of appearing whiter or fairer. This ends up looking ashy. You can pick up make foundations in colors ranging from cream and ivory to peach and darker. Test a foundation color by applying a thin line of color to the jaw line. This will allow you to compare color to the skin on the face as well as the neck to avoid any obvious differences. The color should blend perfectly with your skin tone. Once and for all its over. Ok?
* The vital makeup foundation tip is to blend it well. Ensure that your face and neck appear the same color and the foundation has been well blended near the hairline and the jaw line.
Foundation Application Technique
Foundation Technique 1: Concealer/ Foundation
Gently blend concealer using the middle finger under the eyes to conceal dark circles and apply on blemishes or discolorations. Shake liquid foundation well, then apply on forehead, nose, cheeks and chin using a facial sponge. This will allow the makeup to blend more easily into the skin.
Foundation Technique 2: Ultra-Finish Foundation
Apply foundation with a chisel brush in a circular motion over your entire face for a natural, even matte finish. Apply with a facial sponge for more coverage.
Use Translucent Veil Face Powder or loose powderto set liquid makeup. Apply with a powdered brush, blending down. You may also use a dry facial sponge for extra coverage, if needed.
Foundation Technique 4: Blush
Apply blush with a makeup brush in light stroke to the apples of your cheeks. Blush should be no closer than the width of two fingers near the nose or eyes.
There are several different ways to apply blush depending on the shape of their face.
1. For a very round face, apply the blush in a C-shape.
2. For a very long face, apply the blush horizontally. If you apply the blush in a long straight downwards stroke, then it will make the face appear longer. To shorten the face, apply the blush in a horizontal shape.
First, apply blush to the apples of the cheeks. Use a highlighting shade for the top of the cheek and then use a darker shade of blush just underneath in the hollow of the cheekbone. This will make your cheeks look like they are contoured.
Make sure that you are using a good cheek blush brush with a rounded head.
Tapping the powder down into the bristles of the brush will allow a small amount of blush to be applied at a time. This will eliminate the possibility of applying too much blush at one time.
To give an appearance of high cheekbones, use a lighter shade of blush on the upper cheek and a darker contour shade under the apples of the cheeks.
Foundation Technique 5: Bronzer
The last step in your makeup application is to apply bronzer to give you that sun kissed look.
You always want your foundation to exactly match the color of your skin. If you want more color, then apply bronzer.
The way to apply the bronzer is to image that the sun is shining down on your face.
Lightly apply the bronzer to the top of your forehead, the top of your cheeks, on the end of your nose, on your chin and across the top of your shoulders. This will give you the beautiful sun kissed look that you desire.
Bronzer is best applied with a bronzer or kabuki brush. Lightly press the brush into the bronzer and then tap end of the handle so that the bronzer goes down into the bristles. Apply the bronzer by lightly brushing across the top of your forehead, a little on top of your cheeks, on the end of your nose, on your chin and then go lightly across the top of your shoulders.
Now you have completed your makeup application and have the look that everyone wants.
Having an eyelash extension procedure can improve the appearance of your eyes and create dramatic accents that need no mascara.
Permanent Eyelash Implants
What is Permanent Eyelash Implants?
Many people find that they would like to extend their eyelashes, or make them thicker and fuller. There are many techniques used in order to forward this aim. It is possible to receive semi permanent eyelash extensions, use makeup (such as mascara), or even have surgical eyelash implants. These implants amount to having new, permanent eyelashes placed on the upper eyelid. While some people really enjoy the results of this procedure, others find the thought of surgery so close to the eye and its inherent dangers too difficult to face.
Permanent eyelash implants are in reality a transplant surgery. Understand the process of eyelash implant surgery, which is done under local anesthetic. Hair, including the follicle, is removed from the back of the scalp and then transplanted into the eyelash. Generally, about 30 hair follicles are implanted into each upper lash. The whole process takes 1 to 2 hours and is done as out-patient surgery.
Maintain your lashes with regular trimming because your hair continues to grow just as it does on your head. If you have especially straight hair, you may need to curl your eyelashes with an eyelash curler for a natural look. If you have curly hair, your eyelash hair may need straightening.
If you feel that you have a valid reason to get this work done, you must make sure that you understand what will be involved. It is certainly not a cheap or easy option to choose and you will feel some level of pain due to the nature of the surgery and the area that is worked on.
Eyelash implants will cause aches and pains due to the nature of inserting individual hair follicles. It will also be uncomfortable having hair taken from one part of your body to be placed in another.
For those who desire a procedure that does not include a knife, and probably costs less, semi permanent eyelash extensions are available. These extensions are adhered directly onto the lash, and produce much the same effect (or better, since the extensions have curl to them) as implants. But they are painless, and you do not have to worry about the problems that can be associated with surgery. Additionally, because they are resistant to tears, sweat, sun, and even water (such as showering or swimming), they can last more than two months with proper care.
Procedure of Eyelash Implants:
Using comfortable, computerized local anesthesia (The Wand®), the procedure is completed in less than two hours in the office/out-patient setting. Hair follicles from the back of the scalp (‘donor area’) are harvested and then implanted into the eyelid. Absorbable stitches are used to seal the donor area, which remains undetectable both during and after the healing process. Usually 24 to 40 or more lashes can be placed per eyelid during a session. The implanted follicles (like the seeds of a plant) will grow and produce hair permanently. The newly growing lashes will possess the same characteristics as scalp hair. The lashes will need to be routinely trimmed and curled. An ‘eyelash perm’ is recommended for those patients with straighter hair.
Medication for pain relief is provided as well as medication to reduce swelling. It is recommended that the patient have transportation to and from the office. Several hours after the procedure, some mild discomfort may be experienced in the donor area, as well as the eyelid. Patients are instructed in the gentle post-op care and cleansing of the eyelid and lashes. Some mild swelling and/or bruising in the eyelid area may last about 10 days. The absorbable stitches may take up to one month to dissolve completely. It is recommended that eye makeup (including mascara) be kept to an absolute minimum during the immediate post-op healing period (1 week). Some patients may require an additional session of eyelash transplantation to reach their restoration goal.
resource : Dr. Bauman How to Maintain Eyelash Implants?
1. Step 1
Stay out of swimming pools and spas for 48 hours after you receive the eyelash implants to ensure proper bonding. Postpone taking a shower for 24 hours after the implants.
2. Step 2
Maintain lush lashes by using an eyelash brush. This keeps them smooth and helps avoid unsightly clumping.
3. Step 3
Use water-based, but not waterproof, mascara. The waterproof mascara agents might compromise the bonding causing your eyelash implants to fall out.
4. Step 4
Steer clear of oil-based beauty products including makeup, makeup remover, cleansers, soaps and skin creams, which might also compromise the bonding.
5. Step 5
Apply a sealant when the eyelash implant procedure is complete in order to maintain the strength of the bond and protect the extension from breakage. It should make your eyelash implants last even longer.
6. Step 6
Touch up the implants every two to four weeks to maintain the lustrous look.
Eyelash Conditioners which help stimulate increased length and density of eyelashes. The family of chemcial compunds such as prostamides, prostaglandin analogues and related molecules have been noted to substantially improve eyelash growth when used daily. Eyelash transplantation is used permanently redistribute follicles into the eyelid--which grow so long they need to be trimmed.
Celebrity Eyelash Extensions
The hot new celebrity trend which is here to stay Semi-Permanet Eyelash Extension giving you longer, thicker and natural looking eyelashes. Eyelash extensions are worn by celebrities like Nicole Kidman, Star Jones, Paris Hilton, Gwen Stefani, Lucy Liu, Naomi Campbell, Liz Hurley to name a few.
Semi-Permanet Eyelash Extension
How long will they last?
Well, for all your time and money, an eye lash extension will only last as long as the eyelash that it is glued to lasts. Everyone’s eyelash cycle is different, but the average eyelash life is about 2 months. Of course, your life style will play a major role in the length of time you extensions last. You can shower, swim and go the spa. They can even withstand the sauna or steam room. However, daily or extensive exposure to steam or intense heat may cause the bonding agent to loosen. You may need to go back to your salon to have a few eyelashes touched up, as they may fall off or lift up.
Eyelash Extensions Procedure and Results
Want to have lasting long lashes, then opt for eyelash extensions. Learn more about the eyelash extensions procedure, how it is done and look at the result photos before and after the eyelash extensions.
Have you ever wondered how come all female celebrities have that sexy, wide-opened, big-eyes look? Why are their lashes so long, thick, curly and frame their eyes beautifully?
The answer is simple - eyelash extensions - a new new trend in makeup.
First of all, if correctly and professionally applied, they feel and look very natural!
Eyelash extensions are glued to your own eyelashes individually; they come in different color, lengths and thickness.
Applying Eyelash Extensions
Eyelash Extensions are single synthetic lashes that are attached to each of your individual eyelashes. If correctly applied, they are practically undetectable to you or anyone else. They will add length, thickness, and fullness that can't be achieved with traditional makeup.
A nice full application of Eyelash Extensions will take any where from 1 ½ to 3 or more hours depending on your technician's skill level and experience. This is a very tedious, time consuming procedure if done correctly, but the results are definitely worth it!
Eyelash Extensions Before and After
Eyelash extensions last only for a certain period of time. To be more concise, a set of extensions will only last as the individual hairs will stay glued.
This means approximately 2 months in which you can do everything just as usual.
Remember these important rules about your eyelash extensions:
Do not get lashes wet for12- 24 hours
Avoid hot steam or sauna
Avoid running water directly on your lashes
Do not rub your eyes
Only use water based mascara (optional)
If applying mascara do so from middle to tip, avoid root area
Use water based eye makeup remover
Do not use a mechanical eyelash curler
Do not pull on your lashes (this may cause your natural lashes to come out prematurely)
Don’t use waterproof mascara, as it will dissolve the bond with lash extensions. Many lash extension artists use medical grade adhesives, which are said to be totally safe around the eye area. Eyelash extensions are said to be safe for contact lens wearers as well.
Pimples are a skin condition that typically occurs around the age of puberty, give or take a few years. This skin condition can produce a blemished face which can cause mental anguish particularly when the acne is extreme. In many cases of acne, certain bacteria are the cause and the extreme amount of oil secretions aggravates the creation of the bacteria. Many parents and adolescents like to look for herbal pimple treatment that will combat the skin condition effectively. Although there are several kinds of herbal pimple treatment methods, not all of these may have the desired effect on everybody. Not all acne herbal treatment affect people the same way.
TYPES OF ACNE:
Closed Comedo (White head): If the plugged follicle stays below the surface of the skin, the lesion is called closed comedo or white head.
Open Comedo (Black head): If the plug enlarges and pushes through the surface of the skin, it is called an open comedo.
Papule: The mildest form of inflammatory acne is called papule, which appears on the skin as small, firm pink bump.
Pustule: Pustules are small round lesions, unlike papules; they are clearly inflamed and contain visible pus.
Nodule or Cyst: They are large, usually painful, inflamed, pus filled lesions within the skin. Both nodules and cysts often leave deep scars in the skin.
Acne conglobata: It is rare but serious form of inflammatory acne which develops on the back, buttocks and chest.
Some of the more effective herbal pimple treatment methods are Chinese herbal remedies. In most cases of these kinds of herbal remedies, the herb is mixed with another to create a potent mixture or concoction while other herbs work on their own as herbal acne treatment.
Studies have shown that green tea is a very effective herbal treatment for those suffering from acne. Green tea is quite unique as compared to other teas in that it is not fermented. This useful herbal tea is steamed very quickly after it is harvested in order to keep all of its active ingredients in tact.
Green tea can reduce inflammation and aides in detoxification, which is extremely helpful to those suffering from acne issues of any kind. Overactive hormonal activity, which is a huge factor in acne breakouts, can also be limited by using green tea.
If you drink green tea to clear up your acne make sure that you do not add any sugar or other types of sweeteners to your tea. Doing so will result in all the positive effects of the tea to be negated.
Washing acne with this tea will reduce inflammations and aides in detoxification. If taken orally, it clears up the hormonal activities which are responsible in acne problems.
Tea Tree Oil (Melaleuca alternafolia) - Acne Herbal Treatment
It is an extraction from Melaleuca tree. This herb is highly recommended not just as herbal pimple treatment but also for treating scratches and shallow wounds. Tea tree oil has antiseptic, antifungal and antibacterial properties which come in useful in treating acne. This herbal pimple treatment is also useful for feminine hygiene, an antibacterial wash for the face, treatment for cuts and scrapes, nail fungus, ringworm and others.
Several laboratory studies have shown that tea tree oil effectively slows down the growth of Propionibacterium acnes (the bacterial strain associated with acne) thereby potentially reducing inflammation associated with the skin condition.
Tea tree oil needs to be diluted from its original pure form and should not be taken internally as this could cause some serious damage to the nervous system. Use herbal acne treatments externally only.
Treating the acne with tea tree oil will cut down the effect of inflammation and infections.Applied to pimples after washing and drying the skin, tea tree oil can reduce the duration and swelling of a blemish.
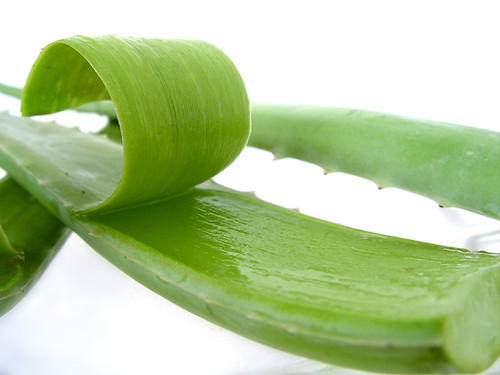
Aloe Vera Gel- Acne Herbal Treatment
Aloe Vera gel as herbal pimple treatment is applied topically on the acne and to be used for its antibacterial and astringent properties. Herbs have laxative properties so care needs to be taken when applying on ones skin. One might react adversely to this treatment so it might be beneficial to first perform a test to see how one reacts to it before any extensive applications.
Aloe vera has other properties other than just helping sunburn; extracted for the aloe plant it also hydrates skin and can be sued on cuts as well. Aloe vera can aid in keeping the skin supple, and has been used in the control of acne. It can also prevent scaring, fade marks and help heal acne spots. The pulp of the Aloe vera is an excellent skin cleanser.
Calendula- Acne Herbal Treatment
Hunt the bright yellow marigold in search of Calendula, the herbal ingredient found in essential oils and tinctures and known for its ability to control acne by reducing the inflammation and redness. Apply a dab of Calendula tincture on pimples at bedtime. Dilute a drop of essential oil with olive oil and gently apply before you fall asleep.
This flowering herb is often used as a remedy for damaged skin. It promotes skin healing and also contains analgesic, antibacterial and anti-inflammatory properties. This herbal pimple treatment also encourages the production of collagen which is essential for elastic and healthy skin. The flowers of the calendula are edible and can be great for decorating food.
The use of a herbal pimple treatment can be beneficial for people as compared to chemically produced medicines. There are some drugs and medications which create harmful reaction son our bodies.
Fenugreek Leaves - Acne Herbal Treatment
A paste of fresh leaves applied over the face every night and washed with warm water prevents pimples, blackheads, whiteheads, dryness, wrinkles etc.
Mahonia or Oregon Grape (Berberis Aquafolium) - Acne Herbal Treatment
This herb has traditionally been used as an internal medicine for treating acne. However, one recent study, using Mahonia topically showed this herb to decrease sebum, reduce infection and inflammation. The antibacterial compounds in this herb is berbamine and berberine, which are also believed to reduce sebum production and kill bacteria when used topically. When used internally, these compounds are liver tonics that improve bile flow, stimulate digestion and act as a tonic on the bowel wall.
Golden Seal (Hydrastis Canadensis)- Acne Herbal Treatment
Topically, golden seal is an effective antibacterial, mainly due to its berberine content. When used in combination with Marshmallow to sooth inflamed skin it will reduce redness and kill bacteria causing infection. Internally, golden seal has historically been called the "King of Tonics", and is used as an antibiotic, liver tonic, and will increase bile production which in acts to detoxify the body by increasing elimination.
Burdock, Yellow Dock (Rumex crispus) and Dandelion (Taraxicum officinalis), Cleavers, and Echinacea
Together, these herbs work as what once was referred to as “blood purifiers”. Today we use these herbs to improve digestive function by increasing the output of bile from the gall bladder into the small intestine. Many traditional herbalists will prescribe these herbs together as an overall tonic for the liver and gall bladder. If we view our liver as the main filter for removing toxins and metabolic by-products from our body; we can see that by improving liver function, the herbalist helps the body to remove unwanted waste and allows hormonal imbalances to normalise before having to resort to stronger herbs.
To help regulate and hormonal problems, women can try chaste berry used daily.
To Use 1: Steam your face for five to ten minutes to clean the pores with hot infusions of lavender, camomile, or thyme. 2: Rinse your face with honeywater, rosewater, or a dilute infusion of marigold tea to tone and close the pores. 3: Do this every day until the skin starts to heal.
Other Acne Herbal Treatment
Here are some other herbal acne treatment against . Some kinds of acne herbal tea you can easily make at home or find in a health food store. Here are the ingredients:
You can also make a tea using any one of the following herbs. Chose one of these herbs or combine 2 or 3 of them to make a more powerful herbal acne tea. Drink the tea throughout the day.
And here is a herbal extract, used to improve liver function, purify the blood, reduce acne inflammation, and fight acne bacterial infections.
The name of the herbal extract is Burdock-Sarsaparilla Compound and contains the following herbs:
* Burdock mature seed - helps to purify the liver, balances hormones, neutralizes acid, is anti-inflammatory, and useful in purifying the blood. * Jamaican sarsaparilla root – helps scaling skin, is blood purifying, reduces itching, helps balance hormones. * Nettle mature seed – is anti-inflammatory for the skin, neutralizes acid waste with its high mineral content. * Yellow dock root – rich in iron and works to improve liver function, helps build good blood, helps purify blood and lymphatic liquid, helps increase bile, which helps to reduce constipation. * Spilanthes flowing herb – improves immunity to fight bacterial infection on the skin. * Sassafras root bark – blood cleansing, anti-inflammatory for the skin.
Honey Bee Pollen
Follow the honeybee’s lead and apply a natural ointment that contains pure bee pollen. Brimming with essential amino acids and B vitamins, dabbing bee pollen on your blemishes provides a dose of healthy antioxidants directly to the infected skin.
1 tsp. Honey mixed with water is good for all skin blemishes, and leaves the skin youthful & glowing. Honey mixed with milk, curds and ground sesame seeds in equal proportions is a sure formula for fair and lovely skin.
Garlic- Acne Herbal Treatment
Keep vampires and blemishes at bay with nature’s own remedy: garlic. Often used for infections, just peel and slice a garlic clove in half and hold the cut side on your blemish or use a small adhesive bandage to hold it in place all night.
Garlic Juice with 3 parts water is an excellent cleansing agent. Raw garlic applied ( rubbed) on the face can make persistent pimples/acne even in adults disappear without a trace/scar with repeated applications. The external use of garlic helps to clear the skin of spots, pimples & boils. Taking 3-4 pods of raw, skinned garlic, finely cut, combined with puffed rice and swallowed with water helps to clear skin infections quickly. The raw smell of garlic can be avoided by first soaking the skinned pods for a half an hour in milk.
Chinese Treatment of Acne
Chinese Herbal Medicine: Chinese herbal formulas are customized according to the TCM diagnosis made by the physician. Combinations and dosages of herbs are chosen and adjusted to work specifically for the individual. When administered correctly by a qualified TCM Doctor, Chinese herbs have been proven safe & effective without adverse reactions. In addition, quality control and safety research are implemented. Chinese herbs are provided in different forms: raw form (which is boiled to make a liquid), tablets, capsules, powders, and tinctures.
Food Cures: Chinese Medicine physicians include dietary & supplement recommendations in their treatment regimens. Here are some examples:
Some foods that can help alleviate acne: squash, cucumbers, celery, carrots, carrot tops, lettuce, potato, cabbage, beet tops, alfalfa sprouts, mung beans, dandelions, pears, cherries, papaya, persimmons, raspberries, and watermelon. Drinking plenty of water helps too.
Some foods to avoid or limit: spicy and oily foods, coffee, alcohol, sugar, chocolate, ice cream, soft drinks, dairy foods, red meat, shellfish, bamboo shoots and white mushrooms.
In prescribing herbal formulas, Chinese physicians generally do not take a "one dose fits all" approach. Chinese herbal formulas are customized. Each person is presumed to present a unique pattern of harmony and disharmony. Combinations and proportions of herbs are chosen and adjusted to fit not the ailment but the individual who suffers from the ailment. Two patients of acne are likely to be prescribed with different formulas if, for example, one was a nervous fellow with a dry tongue, while the other was easily tired and sleepy.
Acne formulas
1. Two formulas from , by Dr. Henry C. Lu (Kodansha International Ltd., 1997), p. 144:
a) 10 grams of lily (bai he*), 100 grams of mung bean, 5 grams of rock sugar.
b) 9 grams of peach kernel (tao ren), 30 grams of Job's tears (yi yi ren), 9 grams of seagrass, 9 grams of kelp, salt as seasoning.
2. The formula from , by Dr. Carol Hart and Magnolia Goh (Dell Publishing, 1998), pp. 145-46:
8 grams of Japanese catnip (jing jie), 8 grams of sileris root (fang feng), 8 grams of dahurian angelica (bai zhi), 8 grams of bupleurum (chai hu), 8 grams of gardenia (zhi zi), 8 grams of peony (shao yao), 8 grams of forsythia (lian qiao), 8 grams of scutellaria (huang qin), 8 grams of unripe aurantium (rind) (zhi shi), 8 grams of ligusticum (chuan xiong), 8 grams of platycodon (jie geng), 8 grams of licorice (gan cao), 8 grams of angelica root (dang gui).
3. The formula by the old physician from Beijing:
25 grams of peony tree bark (mu dan pi), 25 grams of Chinese Wolfberry root bark (di gu pi), 50 grams of honeysuckle flower (jin yin hua), 20 grams of forsythia (lian qiao), 25 grams of dandelion (pu gong ying), 15 grams of amur cork tree bark (huang bai), 25 grams of belvedere fruit (di fu zi), 20 grams of densefruit pittany root bark (bai xian pi), 25 grams of portule herb (ma chi xian), 15 grams of pine pollen (song hua fen), 25 grams of figwort root (xuan sen), 40 grams of Job's tear seed (yi yi ren).
* the bracketed words are Chinese transliterations of the herbs. This is for the convenience of some readers who might like to buy the herbs in Chinatown.
How to Prepare Herbal Medicine
There are detailed procedures outlined in the books above as the proper ways of preparing herbs. But for the general public, I think the following steps are good enough:
1. Place the herbs in a lidded earthenware pot; 2. Add just enough cold water to cover the herbs plus an additional cup so that the water level will be slightly higher than the herbs; 3. Bring the water to a boil, then reduce to low heat for another 20 minutes, before removing the pot from the heat; 4. Strain the herbs to get a cup of herbal tea and drink it when it's warm; 5. Repeat the process each day for 60 days.
Side effects
Chinese herbal medicine is well-known for its lack of side effects. Minor problems can arise: Chinese herbs can cause gastro-intestinal reactions (nausea, diarrhea, vomiting), or allergic reactions (skin rash). If you have these reactions, stop the medication.
Vitamins and Nutritional Supplement for Acne Treatment: Zinc Supplement Zinc is one of the best minerals to use for the treatment of acne. Several Studies have shown that the mineral zinc may be an effective treatment for inflammatory acne. It reduces the build-up of DHT and promotes skin healing. Zinc in the form of Zinc gluconate or zinc sulfate can help prevent acne. Zinc helps heal blemishes, reduces inflammation, and reduces androgenic hormonal effects on the skin. It is usually regarded as more effective element than antibiotics for skin health. Vitamin A Vitamin A reduces sebum and keratin production and thus it is effective in maintaining healthy skin. Normally a higher dose of vitamin A is required for the treatment of acne. Vitamin B6 Vitamin B6 is essential for the proper metabolism of steroid hormones and can reduce the sensitivity of skin to the effects of testosterone. It may help premenstrual or mid-cycle acne.
Vitamin E It is an antioxidant. It enhances the effectiveness of certain enzymes needed for good skin health and improves the absorption of vitamin A.
Selenium Selenium helps in reducing the inflammation of acne.
Chromium Supplements Chromium helps with blood sugar regulation, which can be an important factor with acne.
Acidophilus Bowel toxicity may contribute to acne flare-ups. Acidophilus supplements like Lactobacillus acidophilus and Lactobacillus bulgaricus are beneficial to maintain a healthy balance of intestinal flora. They also produce small amount of hydrogen peroxide that compel bad germs to leave the body. It is beneficial to take acidophilus in the treatment of acne. resource: * The Herbal Resource * Skincare Company * eHow * Acne Control
This luscious mix of rich acidic berries will leave your hair both conditioned and with rich gloss.
Ingredients:
• 8 Strawberries • 1 tbsp Mayonnaise
Directions:
1. Mash eight strawberries with one tablespoon mayonnaise; 2. Massage into washed, damp hair; 3. Cover with a shower cap, then a warm towel; 4. Wash out with a shampoo/conditioner combination.
Homemade Yogurt Hair Mask
For dry, frizzed out hair, this recipe will bring back the moisture, leaving your hair silky and manageable.
Ingredients:
• 1 egg white (natural moisturizer) • 6 tbsp natural yogurt • 1/4 cup mayonnaise (a great conditioner for dry hair).
Directions:
1. Beat 1 egg white until foamy; 2. Add 6 tablespoons of plain natural yogurt; and mayonnaise 3. Apply to wet hair in small sections at a time; 4. Cover with plastic shower cap or plastic wrap. 5. Leave in for 30 minutes, then wash out with a mild shampoo. 6. Rinse with very cold water. 7. Use monthly to moisturize hair.
1. Mix 1/2 cup honey and 3 tablespoons olive oil; 2. Work a small amount at a time through hair until coated; 3. Cover hair with a shower cap; 4. Leave on 30 minutes; 5. Shampoo well and rinse.
Homemade Fruit Smoothie Hair Mask
Dry-Hair Mask : slather your hair in this rich mask to bring back its luster.
1. Blend 1/2 a banana, 1/4 avocado, 1/4 cantaloupe, 1 tablespoon wheat germ oil and 1 tablespoon yogurt; 2. For extra conditioning, squeeze in the contents of a vitamin E capsule; honey, and buttermilk 3. Apply to hair from roots to tips. 4. Leave in hair for 15 minutes. 5. Rinse. 6. Use twice a month to maintain healthy hair.
Avocado Rosemary Hair Masks :
Ingredients:
• one avocado • fresh organic rosemary. • Break open a vitamin E capsule • olive (for extra dry or thick hair) • a lighter oil (like almond or apricot) • four drops of tea tree two drops of peppermint essential oil. • four drops of orange essential oil • two drops of peppermint essential oil.
Directions:
1. Smash up one avocado with fresh organic rosemary. 2. Break open a vitamin E capsule and mix that in. 3. Add a splash of olive oil for extra dry or thick hair or add a splash of a lighter oil (like almond or apricot) for thinner, less dry hair. Don’t add too much oil, or you’ll get a conditioner, not a masque. The texture should be sticky and thick not runny. 4. Drop in four drops each of tea tree and orange essential oil and two drops of peppermint essential oil. 5. Apply to your hair and let it sit for 30 minutes or so. You could wear a shower cap - but I don’t believe in using them. I just clip my hair up in a twist - it works fine and never drips. Rinse out well in cool water for shiner less fizzy hair.
Cucumber & Yogurt Hair Masks :
Note: This masque is drippy, other than adding some base like flour (don’t do that) I have no idea how to thicken it up. So, you may want to take a nice bath as you let this soak into your hair. Cucumber is also known to fight off chlorine damage well if used weekly.
Ingredients:
• 1/2 cup organic plain yogurt • 1/2 of an average sized peeled cucumber • a tablespoon of honey • a few drops of lavender essential oil • a few drops of chamomile
Directions:
1. Mix in a blender: 1/2 cup organic plain yogurt, 1/2 of an average sized peeled cucumber, a tablespoon or so of honey, a few drops of lavender essential oil, and chamomile. You have some different choices regarding the chamomile. You can chop fresh really fine, boil fresh to a reduction, or add some essential oil of chamomile. I usually have added the oil, or shopped fresh. Boiling is too much extra work. 2. Apply to your head, clip hair up and soak in the tub for 30 minutes. 3. Rinse in cool water for softer, smoother hair.
Homemade Cucumber Hair Mask
As the weather gets colder, you may find your hair becoming brittle and dull. To return the lustrous shine to your locks, use a homemade hair mask. Try this Cucumber to revive your beautiful hair this season.
Ingredients: • 1 egg • 1 eggshell's worth of olive oil • 1 quarter of a peeled cucumber
Directions:
1. Blend the egg, olive oil and peeled cucumber. 2. Spread evenly through your hair, leave on for 10 minutes, then thoroughly rinse. 3. For the best results year-round, continue this treatment monthly.
Homemade Aloevera Hair Masks
Take the case of split ends in the hair, for instance. You just can’t ignore it and leave it to its fate. If left untreated, it leads to poor hair-growth and hair-loss. So make an effort to get rid of split ends with alacrity. Aloe-vera, the natural healer is a fantastic herb; it is not just good your skin but for your hair as well. Even Cleopatra was believed to have rated it highly as a beauty therapy herb. Aloe Gels are used to bring shine and smoothness in the hair. Frizz Control for Curly Hair.
Ingredients:
• 4 big leaves of aloevera • 250 grams of coconut oil
Directions:
1. Aloe leaves are thick, succulent and have a transparent pulp. Slit open the leaf and scrape out the juicy pulp. 2. Use a liquidizer and blend to make it into a smooth paste. 3. Heat coconut oil in a wok and add the aloe pulp. Keep stirring until the oil floats on the top. Strain the oil and bottle it. 4. Take two tablespoons of oil and massage it well into the scalp. 5. your way from the ends of hair to your scalp, see to it that the ends are properly nourished with oil. 6. Leave on for one hour at least.
1. Boil the water and soak rosemary leaves in it. 2. Let it stand for one night. 3. Strain and add vinegar to it. 4. After shampooing, wash your hair with this preparation. It treats the hair very fast.
B. Sesame Oil and Bhailavan
Ingredients:
• 1 tbsp Sesame Oil • 3 tbsp Bhailavan
Directions:
1. Blend the two together and apply it on the head. 2. Leave it on for 2-3 hours 3. Wash it off with a shampoo in lukewarm water.
1. Squeeze ginger root through press to obtain one tablespoon of juice. 2. Mix all ingredients. 3. Apply to scalp and let dry before shampooing. 4. Repeat three times a week.
Coconut Conditioning Cuticles Mask
I still dream of the coconut oil head massages I took from old men and women in Indonesia in trade for some rupiah and a smile. Coconut keeps the dandruff away and this mask helps the kiddies avoid the mid-year lice breakout. Coconut oil application also helps with dandruff problems too and hence much preferable to other strong medicated shampoos.
Ingredients:
• Pressed coconut oil • Towel that is still hot, straight from the dryer
Directions:
1. Take a large chunk of coconut cream and, 2. massage it into your hair. 3. From the dryer, take out a warm towel and wrap it around your head, 4. leaving it for an hour. 5. Wash out the coconut with shampoo and a deep conditioner.
Homemade Chocolate Conditioning Hair Mask
by: Karen Marie Shelton
Ingredients:
• 1 very ripe small to medium sized banana (depending on your hair length and fullness) for easy mashing at room temperature • Use a metal fork • 1 tablespoon of natural honey at room temperature • 2-4 small squares of Hershey’s dark chocolate • Microwave or double boiler
Directions:
1. Use the fork to mash the banana into a paste consistency. 2. Melt the Hershey’s dark chocolate until it is the consistency of a thick liquid. 3. Mix well with a fork until all the ingredients are blended together. 4. Apply with fingertips to the middle and end sections of your dry, detangled hair. 5. Wrap with Saran wrap or a large towel. 6. Leave the mask on your hair for up to 1 hour, or longer if you desire. 7. Get your hair wet with lukewarm NOT HOT water. 8. Use only one shampoo application. And Rinse well. Finish with a cool/cold water rinse. 9. Finished with a swipe of shine product and viola….you have shiny, conditioned hair.
Homemade Dry Mask Vodka Martini
Your hair will feel fresh and clean afterward.
Ingredients:
• 2 tablespoons of vodka (removes oils and buildup on the scalp) • 2 tablespoons of honey (moisturizer) • 1/2 ripe avocado (moisturizer) • 1 egg yolk (conditions scalp and hair shaft)
Directions:
1. Whisk vodka, honey, avocado and egg yolk until creamy. 2. Apply mixture to washed, damp hair. 3. Leave mask on for 30 minutes and rinse with warm water. 4. Shampoo, condition and style hair as usual.
Homemade Hair Masks:
For instant shine:
1. Lightly beat two eggs mixed with some milk and run through your hair. Leave on for five minutes, rinse and you’ll see a shine instantly.
or,
2. Lemon Juice. Mix the juice of one lemon with a cup of water. After normal hair washing, apply this rinse. It will shine even the dullest hair. For dandruff:
Dissolve two aspirins in your dandruff shampoo and watch how it clears up. Use a good moisturizing conditioner afterward. More homemade remedies for dandruff.
For greasy or Frizzy hair:
Materials:
- 1 Cup flour or face powder - 2/3 C. cold water
Instructions:
Mix until lumps disappear. Apply to dry, unwashed hair, smoothing the mixture and your hair straight back. Leave on for 20 minutes. Rinse thoroughly about five minutes. Shampoo with one lathering of mild shampoo. Rinse with cool water. If it is a serious problem, put the powder on heavily for 15 minutes wash completely, condition lightly and style. For Damaged Hair:
- A very ripe banana - A few drops of almond oil (available at health food stores)
Smush the banana and almond oil together in a small bowl. Massage into your hair, paying special attention to the ends. Leave for 15 minutes, then rinse and shampoo. Follow with a light (daily) conditioner and rinse very well. Use this recipe once a week to restore life to your damaged hair.
For Weak And Dry Hair :
A good remedy for weak and dry hair is the hair mask with lemon juice. You will need: 2 tbsp. castor oil /or almond oil/, 1 tbsp. fresh lemon juice and 1 tbsp. honey. Add the honey and the castor oil to the lemon juice.
For Sun-In Lightener:
Materials:
- Juice of 1 lemon - 1 oz. mild shampoo - Juice of 2 limes
Instructions:
Mix all ingredients. Leave on hair for 15 to 20 minutes while under a dryer or in the sun. Rinse out. Style as usual.
Rinse For oily Hair:
1 cup of freshly squeezed lemon juice. After shampooing, pour the lemon juice oover your strands. Massage in for 1 minute, then rinse with lukewarm water. Your hair will be clean and sparkling. Suitable to use every 2 weeks.
For Hair Loss Remedy :
Ingredients:
• 1 tablespoon of aloe gel • 1 tablespoon of honey • 1 tablespoon of garlic juice • 2 egg yolks • 3 tablespoons of chamomile (tea bag content is fine to use) • 24 fluid oz of water
Instructions:
1. Peel garlic and use a garlic press to squeeze the juice out 2. Mix it with honey and place the bowl in the fridge 3. Boil water with chamomile tea for about 30 minutes 4. Stir occasionally 5. When tea is done, take the bowl with honey and garlic juice out of the fridge 6. Stir in an egg yolk into the garlic juice/honey mix 7. Use the mix and gently rub it in your scalp. When you run out of the paste, wrap a towel around your head. 8. Keep on your head for 20 minutes and wash once with a neutral shampoo (I used Johnson's Baby shampoo). Rub in the second egg yolk and wash off using only warm water. 9. To finish off, wash your hair off with the previously prepared chamomile tea. 10. Use this mix once a week. If you don't notice any improvement within a month or so, please visit a dermatologist. For Silken Seal :
Ingredients:
• Apple cider vinegar
Directions:
1. Apply quarter of a cup of apple cider vinegar into damp hair; 2. Leave for three minutes; 3. Rinse it.
For Hair Detangler:
Ingredients:
• 1/2 cup fresh oregano leaves • 1 teaspoon pure vanilla extract • 1 cup water
Directions:
1. In a saucepan, heat all ingredients together on low; 2. Let simmer for 30 minutes; 3. Remove from heat and strain mixture to remove particles; 4. Let solution cool; 5. When cool, pour solution into spray bottle; 6. After shampooing and conditioning hair as usual, spray the solution directly into the hair, saturating the strands and the scalp; 7. Comb through hair and leave on.
For Hair Mist :
Ingredients:
• 1 teaspoon cherry extract • 1 teaspoon almond extract • 1 teaspoon lemon juice • 2 cups water
Directions:
1. Mix all ingredients together and pour into a spray bottle; 2. Shake well before each use; 3. Apply by spraying into hair; 4. Massage with fingers or by combing through.
For Itchy Scalp :
Ingredients: • Herbal tea
Directions:
1. Use a strong, organic herbal tea that has cooled; 2. Following shampoo and conditioner, gently massage into your hair and let sit; 3. Rinse out with cool water.
For Odor Removal :
1 cup of tomato juice will remove odors from your hair.